Saturday, February 1, 2014


Thursday, January 30, 2014
Ooodles of Zoodles
I
can’t even tell you how many of my friends have insisted that I buy a zucchini
noodle “zoodle” making machine. A whole ton of my friends here are Paleo and
hopefully reading my blog week to week. Those friends that are Paleo have
insisted that I try this since I love eating spaghetti squash. So, I’m an old
school TV show watcher and whole idea of that machine reminds me of a hilarious
Cosby Show episode where Cliff is watching infomercials….”Just $19.99! $19.99!”
Anyway, I am a big supporter of the As Seen on TV stuff (come by and check out
my Turbie Twist), but I just can’t seem to get down for a machine that does
something my mandolin can do. So I’m all like, “Yeah, I’ll just make the
zoodles on the mandolin, NBD!” And then I nearly slice my hand off doing so.
But however you cut your zoodles, do try this recipe. I’m no Italian, but I’ll
basically put bacon on anything. So buckle up for this delicious one!
Ingredients
5
zucchinis
12
oz bay scallops
¾
lb bacon, diced
6
cloves garlic, minced
2
Tbsp bacon grease
½
egg, whisked
1
tsp dried basil
½
tsp coconut oil
1
Tbsp fresh parsley, chopped
S&
lots of fresh P
Directions
On
your zoodle machine or on your mandolin, slice zucchini into spaghetti sized
noodles. Then place them on a cooling rack over a baking pan. Sprinkle
liberally with salt and let drain for 30 minutes. You’ll notice the water
colleting on the zoodles as well as dripping down. After about 30 minutes, wrap
handfuls of them in paper towel and get mas much of the moisture off them as
possible. When you unwrap them, you’ll notice they are not firm anymore, but
more like cooked spaghetti. It’s amazing!
Drain
the scallops, wrap them in paper towel as well and press them to get all the
water out. Then season with dried basil. Let sit until last minute.
Dice
the bacon before you cook it. Then brown over medium-high heat
until crispy. Drain, but save the excess bacon grease. In a pan over medium
heat sauté garlic with bacon grease stirring constantly. Just for a couple
minutes, you don’t want to burn the garlic. Add zoodles to pan and sauté for 3
minutes. In a separate pan over medium-high heat melt coconut oil and add
scallops. Cook for a minute or two per side. Meanwhile, turn off the heat from
the zoodles and stir in the egg. Mix in the bacon bits and scallops. Stir well
to get everything mixed together. Garnish with lots of fresh pepper and fresh
parsley.
I think
this could easily serve 4 people if you served it as more of a smaller side
portion with a fresh salad. The crunch and salt of the bacon was perfect with
the richness of the egg. It’s a tiny bit on the rich side, but I’m Big Eater
Small Body, so I ate a lot! I’d suggest making a lot and eating until you’re
done! Maybe I am Italian!

It was super fun to twirl them on my fork too! It's the little things!

Salud!
Thursday, January 23, 2014
Weekly Consumption Approved
I am a crazed burger eater. Ask my husband. I legit suggest Boston Burger Company nearly every single time he asks if I want to go out to eat! In fact, I’ve spent substantial time coming up with ways to justify it. My first justification was post tabata class when I started taking it last year. I’ve told numerous friends that I’m sure I was burning 1200-1500 calories each time I took the class, so obviously as my post tabata, Friday night meal, I deserved a burger! I’ll add that I never eat the bun, so there’s that but I’m not sure that counts for much when, during my busy season at work, I’ve rationalized eating at BBC once a week. You think I’m kidding, but I’m not. Incidentally, I always get a Hot Mess, no bun, medium rare! You should check this out it is dangerous! Did I mention I love danger?
Anyway!!! As a burger lover, I decided a few weeks ago that I wanted to try cooking a new and healthy version that I could perhaps justify eating once a week! What I came up with after some bouncing ideas of Josh and really thinking hard about what I know about food, flavors, and texture was an absolute slam dunk success!
It was a shrimp burger! Please proceed without fear!
Basil Mayo
½ cup paleo mayo (Recipe on yesterday’s blog)
3 Tbsp fresh basil, chopped
Mix and refrigerate overnight
Pickled Red Onion
½ red onion, sliced very thin
½ cup red wine vinegar
½ cup water
Pinch of salt
Mix ingredients and refrigerate overnight.
Shrimp Burger
1 lb raw shrimp (41/50 count), processed in the food processor
10 raw shrimp (21/25 count), cut into quarters
2 egg yolks
2.5 tsp fresh oregano, chopped thin
1 tsp crushed red pepper flakes
¼ tsp salt
¼ tsp pepper
1-2 tsp Coconut oil
Process the first pound of shrimp in a food processor until it’s no longer lumpy. You’ll need to pulse the processor a few times to mix them around so it doesn’t get to mushy. Cut the larger shrimps into quarters. Then mix all of the above ingredients except the coconut oil into a bowl. Patty the shrimp mixture out into 5 patties. Then put in the refrigerator for 10-15 minutes so the mix firms back up but doesn’t cool all the way to fridge temperature. Finally, warm the coconut oil in a pan over medium heat and cook for 5 minutes on the first side or until brown. Then flip the burger and cook another few minutes until cooked through and brown on both sides. To test the doneness of the burger you can press on top. If it’s firm and springs back, it’s done!
Garnish the burger with fresh tomato, basil mayo and pickled onions. I tried to wrap it in iceberg lettuce, which was great really because the crunch is exactly what you need. But apparently I need a trip to NorCal to learn how to wrap a burger in lettuce! It was kind of a mess. Next time I’ll use a knife and fork. Who really cares the method in which you get it in your mouth anyway!

Either way, this was one of my favorite recipes I’ve ever cooked/blogged! It was silly healthy since my mayo is basically a superfood! But the flavors were spot on together. Don’t leave out a component! Even if you THINK you don’t like one of them! I swear this will impress all of your toughest critics!
Salud burger buddies!
Anyway!!! As a burger lover, I decided a few weeks ago that I wanted to try cooking a new and healthy version that I could perhaps justify eating once a week! What I came up with after some bouncing ideas of Josh and really thinking hard about what I know about food, flavors, and texture was an absolute slam dunk success!
It was a shrimp burger! Please proceed without fear!
Basil Mayo
½ cup paleo mayo (Recipe on yesterday’s blog)
3 Tbsp fresh basil, chopped
Mix and refrigerate overnight
Pickled Red Onion
½ red onion, sliced very thin
½ cup red wine vinegar
½ cup water
Pinch of salt
Mix ingredients and refrigerate overnight.
Shrimp Burger
1 lb raw shrimp (41/50 count), processed in the food processor
10 raw shrimp (21/25 count), cut into quarters
2 egg yolks
2.5 tsp fresh oregano, chopped thin
1 tsp crushed red pepper flakes
¼ tsp salt
¼ tsp pepper
1-2 tsp Coconut oil
Process the first pound of shrimp in a food processor until it’s no longer lumpy. You’ll need to pulse the processor a few times to mix them around so it doesn’t get to mushy. Cut the larger shrimps into quarters. Then mix all of the above ingredients except the coconut oil into a bowl. Patty the shrimp mixture out into 5 patties. Then put in the refrigerator for 10-15 minutes so the mix firms back up but doesn’t cool all the way to fridge temperature. Finally, warm the coconut oil in a pan over medium heat and cook for 5 minutes on the first side or until brown. Then flip the burger and cook another few minutes until cooked through and brown on both sides. To test the doneness of the burger you can press on top. If it’s firm and springs back, it’s done!
Garnish the burger with fresh tomato, basil mayo and pickled onions. I tried to wrap it in iceberg lettuce, which was great really because the crunch is exactly what you need. But apparently I need a trip to NorCal to learn how to wrap a burger in lettuce! It was kind of a mess. Next time I’ll use a knife and fork. Who really cares the method in which you get it in your mouth anyway!
Either way, this was one of my favorite recipes I’ve ever cooked/blogged! It was silly healthy since my mayo is basically a superfood! But the flavors were spot on together. Don’t leave out a component! Even if you THINK you don’t like one of them! I swear this will impress all of your toughest critics!
Salud burger buddies!
Wednesday, January 22, 2014
You Say Aioli, I Say Mayo
My whole life I’ve been a mayonnaise eater. My dad is too, so I guess it’s in my DNA. I basically put it on everything. And for all those non-mayo eaters out there, ask yourself this. Do you eat aioli? Yeah? Well, if ya do, you’re my husband. And you’re also being tricked into believing there is a difference. At some point, I believe restaurateurs and chefs all over the world decided to dupe their non-mayo eating public by fancying it up and calling it aioli! So there you have it! Time to reevaluate your eating habits? Am I talking to you?
That said; I’m not a fan of all the crap that is put into commercial mayo. Is this stuff necessary for something so simple? And please, do not disillusion yourself into believing that vegan or soy or non mayo mayo is healthy. This is false. Anything you are purchasing in your grocery store that is, or is claiming to be, mayo has a bunch of stuff in it that you do not need!
Some time ago, I decided to make my own and found that it a) couldn’t be easier b) taste great c) is better for you, maybe even good for you! I actually got this recipe base from The Meanest Momma. But her way with the lemon and cayenne wasn’t working for me so I adapted it a tiny bit to make it taste the way I wanted. It took a little finagling and several failures, but this is the best way to make it…well, in my opinion. I’ll let you form your own!
Ingredients
1 large egg, room temperature
1 tsp Dijon mustard, room temperature
1 Tbsp apple cider vinegar, room temperature
~1 cup Extra Light Tasting Olive Oil
Pinch of salt
1 large egg, room temperature
1 tsp Dijon mustard, room temperature
1 Tbsp apple cider vinegar, room temperature
~1 cup Extra Light Tasting Olive Oil
Pinch of salt
Directions
Put the egg, mustard, and vinegar into a standard 2 cup measuring cup. Let them sit together without mixing for a few minutes. Then add the oil until it reaches just barely under the 1 cup line.
Put the egg, mustard, and vinegar into a standard 2 cup measuring cup. Let them sit together without mixing for a few minutes. Then add the oil until it reaches just barely under the 1 cup line.
It is particularly important to use extra light tasting olive oil. First of all, if it is super yummy olive oil, use it in your salad not to make mayo! Additionally, the really olive rich stuff gives it a strange taste and what I’m trying to do is recreate the mayo I love with healthy ingredients!
Once you’ve added the olive oil, blend on high with a hand blender for about 3 minutes. You’ll want to move it in an up and down motion as well as around to get everything blended well. You’ll notice it start to firm up, but keep mixing for another minute or so after it does. Then stir in a pinch of salt and refrigerate (best if chilled overnight or longer).
The next day it will be creamy and delicious! It’ll be aioli! I use this stuff for a host of things, tuna salad, base for cole slaw dressing, on French fries and you will too! Just call it aioli if you have to!
Check the blog tomorrow for a super tasty way to eat this recipe!!!!

Salud!
Thursday, January 16, 2014
A CBC Recreation
One
of the things that Josh and I missed most about Kentucky when we first moved to
Somerville was the accessibility to outdoor dining. Because there are so many
months that you can eat outside there, most of the restaurants patios. So
one night many years ago, Josh and I went on a search for something casual that
had outdoor seating. We decided to try the Cambridge Brewing Company in Kendall
Square. I like the beer there but we haven’t been back in a long time as there
are so many other options for great food in the Cambridge/Somerville area plus
you can get the beer in other restaurants. However, there was one dish there
that I regularly crave. It was a curried mussels dish. I don’t remember the
description on the menu but I do remember the flavor, so a couple weeks ago I
decided to take a stab at guessing what was in it and recreate it at home. It
was pretty easy to do once I sat down and thought about the flavor and texture.
Here’s what I came up with!
Ingredients

4lbs
mussels
1
can coconut milk
1
cup canned pineapple, diced
Juice
from the canned pineapple
1
cup tomatoes, diced
¼
onion, grated
½
cup chicken stock
1
Tbsp yellow curry powder
1
tsp red curry paste
1
tsp salt
Directions
Mix
all of the ingredients above with the exception of the mussels in a dutch oven.
It should be fairly thin, not like a curry sauce at an Indian or Thai
restaurant. Bring it to a boil stirring constantly. Then bring the heat down to
low and let the sauce simmer for approximately 20 minutes stirring occasionally.
This will get the curry and pineapple well married. Separate the sauce into two
dutch ovens. Then turn the heat back up on both pots, put the half the mussels
in each pot, and cover with a lid. Cook for 2-3 minutes then stir them bringing
the mussels on the bottom to the top and vice versa. You want to cook them only
until the mussels open. Do NOT cook them any longer because they will over cook
and there is nothing worse than over cooked seafood. You’ll need to keep an eye
on them to make sure. If you don’t have 2 dutch ovens, you can always cook them
in two batches.
I’ll give you a couple quick tips on the
mussels. 1) They need to be alive when you cook them. To check this, firmly tap
open mussels on the side of a bowl. If the mussel closes up, they’re fine. If
they don’t, toss them. 2) I usually then give them a good rinse and remove any
beards. The beards are the hairy looking part that sticks out the side. A firm
pull with a back and forth motion will get that out. You do not want to eat
this, so check every mussel when you rinse them.

This
hit the spot exactly. It’s a little sweet and a little spicy and overall just
very delicious. I like to break one of the shells in two and use one side as a
kind of spoon that way I get the broth, the mussel and some of the fruit in one
bite. It’s a bit messy this way, but it’s totally worth it!
I
hope you enjoy this as much as I did. Seems crazy to me that it took me 6 years
to try it, but I know it won’t be that long before I make it again!
Salud!
Thursday, January 9, 2014
Another Crappy Stir Fry....Kidding! Kiiiiiiidding!
I
cook stir fry every once in a blue moon. The reason? Because it’s quick and simple.
Well, I say simple, but I don’t actually mean it. Yes, sautéing vegetables and
protein is easy. However, the truth is, I think it’s extraordinarily difficult
to get the sauce right. Especially if you’re not drowning it in sugar! Healthy
stir fry that taste really good is tough. I don’t care who you are, this is
fact. So typically I resign myself to a cheat day and get it from someone who
knows what they’re doing.
But
when our family was in during Christmas, we bought a veggie tray so that we’d
have cut up veggies to snack on. We had leftovers from our second tray that was soon going to be a wilted mess, so I needed to use up the veggies. I decided to make another crappy stir fry. Only….this time it wasn’t crappy! It was actually really yummy and while it contained ingredients I don’t typically include in my diet, it was still healthy and I ate it guilt free! The veggie tray, incidentally, is from Whole
Foods. This sounds trivial; however, it is so important. In a typical veggie
tray you get broccoli, celery, carrots and tomatoes. Sound right? In the Whole
Foods one you get cukes, broccoli, carrots, cauliflower, celery, tomatoes,
peppers of all colors, zucchini and summer squash. This is the holy grail of
veggie trays!
Ingredients
Stir
Fry:
2
chicken breast, cut into thin strips
Sliced
peppers
Zucchini,
sliced into thin strips
Summer
squash strips, cut into thin strips
Broccoli
florets
Snap
peas
Scallions,
sliced
1
Tbsp Coconut oil
Sauce:
¼ cup
peanut butter
*make
the ingredients are just peanuts, no extra sugar, salt, fat, etc.
2
Tbsp gluten free soy sauce
1
Tbsp white wine vinegar
2
Tbs olive oil
¼ plus
a little extra cayenne pepper
2
splashes fish sauce
Directions
First,
I did not indicate the amount of veggies you need. I fill up a medium bowl for
two people. But if you like more veggies, go ahead! Don’t add the scallions to
the bowl for sautéing. Mix up your peanut butter sauce first. Then combine
everything from the sauce list except the fish sauce in a bowl. It should be
thin(ish). Be sure to taste it…never know, might want more cayenne! Keep it to
the side for later.
Melt
the coconut oil in a pan over medium-high heat. When the pan is good and hot,
add the chicken. Now let it sit. Do not stir it. Just let it cook. Your brain
will tell you to move it, but don’t. After about 4 minutes, stir it. This gets
one side caramelized. When the chicken is cooked through, take it out and cover
it with aluminum foil. Then add a touch more coconut oil to the pan, sauté your
veggies for a couple minutes. You don’t want them soggy, so not too long. I’d
say 5 minutes or so. Add the chicken back to the pan. Reduce the heat to
medium-low.
Then
splash a couple splashes of fish sauce over the stir fry. Do not go overboard.
Stir and cook some until some of it cooks down. Not long…a minute or two. Then
add the peanut butter sauce. Stir to evenly coat and garnish with sliced
scallions.

I
loved this for a couple reasons. A) I love peanutbutter. I don’t think this is
a secret. B) It’s spicy! Although you can tone it down if you like, but I may
make fun of you! C) It’s quick. If you use a WF veggie tray, you can bang this
whole thing out in like half hour! The not chopping vegetables is key!
Welllllp
Hannah, I hope you like this and thanks for requesting that I blog it!
Salud
to all those who hate making stir fry too!
Thursday, January 2, 2014
Jingle Bell Brunch
Right
after they postponed the Jingle Bell Run in Somerville, my work/running posse
and I decided that if we couldn’t run then drink together, we’d just pot luck brunch
and drink together. Easy solution to what was a total bummer in addition to the
mound of wet heavy snow we received that pushed the race back a week! Lucky for me
everyone had already planned on being in Somerville, so I suggested my house as
a venue knowing I wouldn’t want to go into the city! The only one with a
contingency was Ellen who didn’t want to come if I was making super health
wheat grass kind of food! I assured her it wouldn’t be wheat grass but couldn’t
promise anything on the healthy part. It should be noted that I met Ellen my
first week at work and I happened to be in the middle of a 21 Day Cleanse so I
continually catch jokes at the office about my eating habits!
So
my goal for the afternoon was to make something healthy that everyone would
love and I think I succeeded, but I think Gia in particular liked it more than
the rest of my crew! Although who would know after numerous bottles of
champagne?.....don’t ask about the dance party in my living room….well party
might be a stretch, mostly it was Matt and I! It was a seriously wonderful day
with some of my most favorite people in the world!
Ingredients
1-1.5
sweet potato, shredded
20
eggs, mixed
½
roasted chicken meat, diced
1
½ red bell pepper, diced
1
8oz container sliced baby bello mushrooms
2
tsp dried thyme
1
Tbsp dried basil
1
Tbsp dried oregano
2
tsp salt
1
Tbsp ground pepper
Coconut
oil
Directions
Shred
the sweet potatoes in your food processor. Wrap them all with a couple layers
of paper towel and squeeze. Unwrap and replace with more paper towel then let
sit for an hour or more. Pre-heat your oven to 350 degrees. In the meantime,
dice up the chicken and peppers, toss them together with the mushrooms. Then
whisk up your eggs with thyme, basil, oregano, salt and pepper. After your
potatoes have dried out some, spray the bottom of a 9x13” glass baking pan with
coconut oil then press down a layer of shredded potato on the bottom and sides
of the dish. Bake just the potatoes for about 15 minutes or until they start turning brown and crisp. Put the chicken, mushroom, and pepper mixture in the pan on top of the potatoes, then pour the
eggs over top. The eggs should just cover the chicken mixture. Bake for a little over
an hour, but check it by touching the top. If it’s firm and there’s no liquid
on top, it’s done!
Best
served with mimosa and your pals!

Salud!
Thursday, December 19, 2013
Missing My South Africa!
It
seems like life has really taken me away from my blog! I apologize to those of
you that look forward to reading. But for now, I’m back for at least another one
more! As some of you may know, I just to back from South Africa! What an
amazing trip it was! Not only is it stunningly beautiful there in all different
kinds of ways…not only did we see all kinds of animals, but the people truly
made the trip special and I will hold a small place in my heart for South
Africa always. That said, one thing I wasn’t too wild about was the food. Our accommodations
were pretty much catering to a European clientele and for the most part it was
just boring old fine dining! But I did manage to talk one of our lodges into
making traditional African food. I believe the quote goes like this, “Melvin, I want to eat what your mother cooked you as a kid!”
So
one evening we had a huge barbeque with South African food that you could find
on Melvin’s mother’s table and holy smokes was it good! All of it. However, the
best thing on my plate was African Peanut butter spinach! I don’t think it is
any secret that I love peanut butter. I love it so
much that I typically plop a spoonful of it in my chicken soup! Don’t judge! I
just don’t happen to eat it too often. But this dish was so delicious and
nostalgic that I just couldn't stomach replacing the peanut with almond butter!
I hope you enjoy it as much as I do!
Ingredients
3
plum tomatoes, diced
½ small
onion, diced
1-5oz.
box baby spinach
1-5oz.
box baby kale
3.5
oz peanut butter
1-2
Tbsp Coconut oil
S&P
Directions
Heat
sauté pan over medium-low heat and add coconut oil. Sauté onion until
translucent. Add tomatoes until soft. Then slowly wilt spinach and kale into
the pan stirring frequently. When the greens are completely wilted, add peanut
butter and stir until evenly coated. You may need to add a smidge of water to
keep it thin(ish). Stir in salt and pepper and serve piping hot!

This couldn't be simpler to make. And to me it is seriously delicious. Not just
because of my sentimentality to the trip, but also because, DUH…peanut butter
makes everything better! I encourage you to try this even if it sounds strange
to you! But if you need me to send some pictures of giraffes to truly enjoy it,
let me know!

Thursday, November 7, 2013
A Sauce Constructed BY me FOR me
Recently I've noticed that it seems like it might be winter. This is a devastating
realization as my favorite season, autumn, has come and gone and I’m not sure I
joined her! Additionally, I have a nagging feeling that we may have a blizzard
at any moment. Huge sigh! That said, I’m reaching for a healthy dose of fall
flavor. I’m not sure but I think I associate fall with cherries because of
Thanksgiving. Cherry pie at Thanksgiving is one of my favorite things and
honestly cherry anything pretty much makes me happy. Even cherry ring pop!
I
had Mahi Mahi as protein so I decided to make a rustic cherry sauce to go with
it as the highlight of the blog this week. I had previously picked up dried Thai
chile peppers and was dying to try to cook with them for the first time! Hello delicious
sauce! Kind of like me, a Spicy.Cherry.Sauce! Womp Womp
 Cherry
Sauce
Cherry
Sauce
1/3
C dried sour cherries, reconstituted in hot water
5
dried Thai chiles
10
oz black cherry spread
4-5
oz crimini mushrooms, sliced paper thin
Salt
First
and foremost, use a black cherry spread that is sweetened with fruit juice and
the only other ingredient is pectin. I found this fancy one while I was
shopping in the South End. Whole Foods has its own brand though that is much
cheaper and equally tasty. Melt down the cherry spread over medium-low heat then
toss in chile peppers and sauté, stirring frequently. Let it cook down and soak
up the heat a bit. Then toss in the reconstituted cherries and stir. After the
sauce has thickened back up a little, toss in the mushrooms and sauté them,
stirring frequently, until the mushrooms get soft. Stir in a pinch of salt at
the end. Do not skip this, the heat won’t come through as well without it!

Spoon
the sauce over a piece of simply seasoned (salt and pepper) mahi and a
vegetable. I used asparagus that I simply sautéed in a pan. Thing is, you do
not need extra seasoning on your plate because this sauce is bold, complex and
delicious.
I’m
not sure what it is about mushrooms and cherries that makes me think of autumn,
but this was terrific. I mean really super! If I did it over, I’d probably try
it with duck breast instead, however, this was fantastic and didn’t overpower
the fish at all. If you try it with duck breast, tag me on Instagram
@bigeatersmallbody and let me know how it was! And if you need a tip on how to
cook that duck breast, comment on this or on the photo on Instagram!

Salud y'all!
Thursday, October 31, 2013
Crepe-y Halloween
On
my very first night ever in Boston, I ate at a Spanish Tapas place on Newbury
Street called Tapeo. I absolutely loved this place! And subsequently took all
visiting friends there for the next, oh 3 years?!?! I never go there anymore
because apparently we’re on a quest in my house to never eat at the same place
twice! I don’t really miss it, but I do miss one of the dishes there. It was a
pimiento con camarones. (A roasted red pepper stuffed with shrimp). It had some
delicious sauce, but not only do I not really remember what it was, I’m not
sure I’d even have the ingredients to make it. However, I wanted to try something
with a similar flavor. I've also really wanted to try to make crepes. I feel
like making them is a skill that is grossly overlooked when you see them.
So
here we go. French crepe meets Spanish tapa!
Crepe
Batter
6
eggs
2/3
cup whole milk
½ tsp
salt
¼ tsp
pepper
Coconut
spray
Mix
first 4 ingredients very well. Spray a thin coat of coconut spray into a 10
inch NON STICK pan on medium-low heat. Drop just a tad under ¼ of a cup into
your pan and swirl it around to cover the bottom. It’s going to look thin, it
should, it’s a crepe. Cook for a few minutes longer than you think you should
(3 min total) then lift a corner with a
spatula. If it’s browned, scoot the crepe to the far of one side, slide your
spatula under and flip it! Then heat for another 3 minutes (or until brown). You can stack them up as you go and
heat them back up later.
****Important
Note****
Stick
with it. You will ruin a few. It will take some time to get the hang of it. I
ruined 6 before I got it down.

Filling
1
lb large shrimp, diced in ¼” pieces
½ bunch
asparagus, diced small
2
roasted red peppers, diced small
1-1.5
Tbsp garlic
Splash
white wine
*I
used sauvignon blanc
2
Tbsp butter
*I
use Kerry Gold its grass fed and it’s Irish, kind of like me!
1
Tbsp olive oil
Juice
of 1 lemon
S&P
 In
a pan over medium-low heat, sauté butter, olive oil and garlic for about 5
minutes. Be careful not to burn the garlic. Then add asparagus and cook for
another 5-7 minutes. Add shrimp and cook until the pieces are just barely pink.
Approximately 5 more minutes. Then throw in the wine and sauté for a minute or
two. Toss in the roasted red peppers and mix until they are heated through as
well. No more than a minute. Juice the lemon over the shrimp mix, with a
sprinkle of salt and pepper and start filling your crepes.
In
a pan over medium-low heat, sauté butter, olive oil and garlic for about 5
minutes. Be careful not to burn the garlic. Then add asparagus and cook for
another 5-7 minutes. Add shrimp and cook until the pieces are just barely pink.
Approximately 5 more minutes. Then throw in the wine and sauté for a minute or
two. Toss in the roasted red peppers and mix until they are heated through as
well. No more than a minute. Juice the lemon over the shrimp mix, with a
sprinkle of salt and pepper and start filling your crepes.
To
do this, keep your heat low and spoon a smallish amount into the middle. Then wrap
them like burritos. I garnished them with some shaved raw asparagus, fresh
parsley and a plain ole green salad dressed with lemon juice and olive oil.
It
looks absolutely beautiful on a plate and it tasted awesome! You could even add
an extra roasted red pepper as the bites with them were the best ones! This wasn't really even close to the dish from Tapeo, but I considered it a valiant
victory over a food I've been afraid to try to make (the crepe) and it was sooo
delicious. Another thing, this is an incredibly light dinner, so it would also
make a terrific brunch or lunch!

Salud!
Wednesday, October 23, 2013
Beets N Sweets
Alright,
last week I said I’m not really a salad lover. And this week, I am going to
blog another salad. Every single time I make a blanket statement like that, I
end up doing something completely contrary to my previous statement.
Must.Stop.Making.Generalizations.
Some
of you know that I run the Relay For Life event in Peabody, MA. If you know
anything about me or Peabody, you know that I am an A-Typical Somerville
resident, who almost never crosses the river and that I only go to that part of
the state for two reasons. First, my beloved Relayers. Second, my friends Steve
and Brit. I had a lunch meeting with a volunteer last year and she asked me to
pick up salads from this place in Danvers called Prime Roast Beef. I was
seriously skeptical, but I did as I was asked. When I went to get them, I
ordered myself what now stands as my favorite salad to date! I literally crave
this thing every week. This little beauty is called “Beets and Sweets” and I
always add steak tips.
So
the problem is that I cannot schlep it to Danvers every week for salad. I drive
a Prius, but an hour round trip for a salad is extreme! Well, this week I
decided to make it myself. How hard could it be? Beets, sweet potatoes, goat
cheese, pecans, steak tips, greens, balsamic dressing. Piece of cake! No….piece
of steak! Ooooooh, I’ll be here all night folks!
Due
to the quality of steak tips that I buy (thank you Matt Napoli, see previous blog
re: “crack tips”), I actually enjoyed my salad better than Prime’s! Ha! I win!
You can pick up these steak tips “original” flavor at Pemberton Market,
Idylwilde Farm, Mann Orchards or directly from them. I’m sure you can get it
other places but these are in towns I’m regularly in. DOMS
Salad
1/3
sweet potato, cooked, cooled and cut in chunks
1
medium beet, cooked, cooled and cut in chunks
¼ cup
pecans, chopped
2-3
Tbsp crumbled goat cheese
2
cups mixed greens
4-6 steak tips
Dressing
3
Tbsp balsamic vinegar
¼ to
1/3 cup olive oil
Pinch
of salt
¼ tsp
fresh ground pepper
Basically
stack the ingredients in a bowl. You’ll want to grill your steak tips for just
a couple minutes on screaming high heat to get a crust, but keep them medium
rare. Bake your potato in the microwave for 8 minutes. Cooking beets is easy
too. Boil them, skin on until you can pierce through with a fork. Then wrap in
paper towel and twist lightly. The skin will separate easily. This couldn’t be
easier and it’s really not a salad…it’s a steak and potato.

This
salad, if that’s what you want to call it, was so pretty, I texted it to two
friends….here are their responses…..

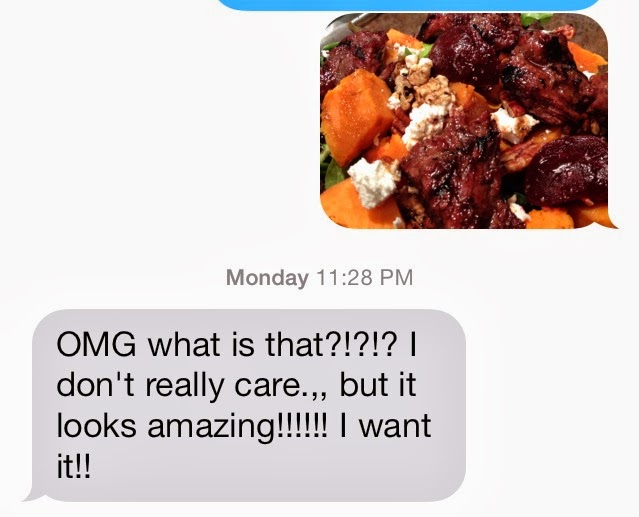
Please
try this yourself, you won’t be disappointed!!! I think my friends deserve this
salad for their terrific responses. Maybe I’ll make it for them!
Salud!
Subscribe to:
Posts (Atom)